Generative AI: Images & Videos
Jump ahead by clicking on one of the projects below.
- Curious Refuge AI Advertising Contest: 2D line animation
- ToonCrafter Model (keyframe pipeline)
- AnimateDiff (rotoscope pipeline)
- Wedgwood Pendent Dancer: 3D animation (realistic, rotoscope pipeline)
- Interested in AI image generation? Here is a list of my favorite tutorials and creators!
Curious Refuge AI Advertising Contest
For more information about the contest: https://curiousrefuge.com/ai-advertising-competition
Created on August 2024
Tools used: Midjourney, ToonCrafter, AnimateDiff, RunwayML, ElevenLabs, and SunoAI.
Timeline: 3 days
Budget: $60
The only real footage in this commercial is the Whipnotic whipped cream cans; everything else including all sounds and music is AI-generated.
For six months, I’ve been developing AI-generated image and video concepts for Western Digital, exploring various tools, methods, and media types to benefit our marketing team. Upon discovering this competition with only three days remaining, I challenged myself by applying my GenAI knowledge outside of work. Over just three nights of work, I created this video, pushing the boundaries of what I’ve learned. As an animation enthusiast, I’m incredibly proud of what I achieved in such a short time, bringing to life a project that would typically require weeks of effort!
This video can be broken down into two main sections, 1) the character in her dinning room and 2) the character dancing in a karaoke dreamscape. Each section relies on two different workflows, keyframes and rotoscope, below I will be breaking down the workflow for each section.
1) Dinning Room – Keyframe Pipeline
This AI workflow mirrors traditional animation fundamentals. In traditional animation animators reference a style and character sheet to learn how the character looks in various poses and the overall feel of how the character acts. Once the character sheets are established a senior animator typically will draw out the key frames, which are the key poses in a sequence. Next a junior animator will draw out the in between frames, the frames that transition the character from one key pose to the next. These steps are adapted into the AI pipeline with Midjourney acting as the character designer and senior animator and the ToonCrafter model acting as the junior animator.
Below is the reference character sheet generated by Midjorney along with the keyframes for the first sequence. In Midjourney, the inital generated character sheet might have inconsistencies with the character. It is important to go in manually and correct any errors. For example, in this sheet all of her expression on the left were initally generated without any freckles so I had to manually had them in with Adobe Photoshop.

When generating keyframes in Midjourney use the prompt template below. This will tell Midjourney what the style of the animation is (–sref), the style of the character (–cref), and how closely it should follow the character style (or in other words what is the weight of the link –cw).
[scene description] –sref [link to character sheet] –cref [link to chracter sheet] –cw [# out of 100] –ar [aspect ratio]


Once we generate our keyframes, we go to ComfyUI to utilize the ToonCrafter model to generate the in between frames. I based my workflow on Mickmumpitz anime video workflow.
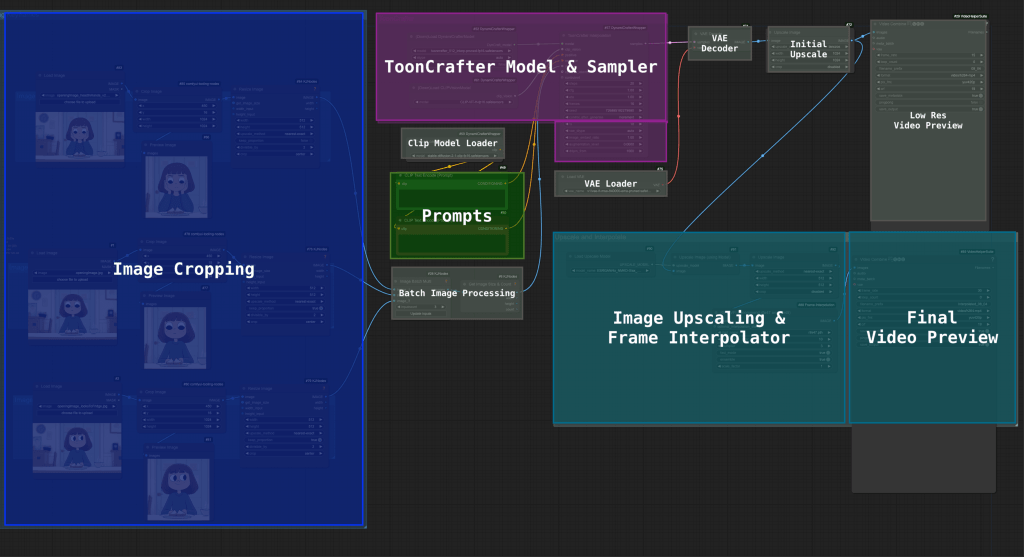
There are four key components in the workflow:
- Image Cropping: Before loading the entire frame we need to crop the image to our area of interest and normalize all the resolutions. ToonCrafter only intakes and outputs low-resolution videos so important we first crop to a specific location so we’re not down scaling our entire frame.
- Prompts: For the ToonCrafter model it’s best of to have no prompts. Instead, focus on good keyframes that tak straightforward movements for the in-between frames. The interesting thing about ToonCrafter is prompts are optional and often can result in strange outputs if included because it now has to balance what it thinks your prompt looks like at the frames it’s been given.
- ToonCrafter Model and Sampler: The key is to ensure you have the right values. Play around with it to see what works best for your images.
- Upscaler and Frame Interpolator: ToonCrafter outputs low-resolution video; by running it through an upscaler and another interpolator, we can match the frame and resolution of our original video.
The full diagram with details is below. You can also download the json file here (link)


The low-resolution output of ToonCrafter will look something like the above. Now, we take the upscaled version (also with higher frames per second) into Adobe Premiere and match it with one of the keyframes to fill in the background. Once we do that, we’ll have a scene with the correct resolution, fps, and aspect ratio.
2) Karaoke Dreamscape (Rotoscope Pipeline)
The whipped cream background is pretty simple, using Runway’s image to video on their Gen 3 alpha model, so I won’t be going into that. What I will break down is the character animation. It involves using ControlNets, IP Adaptors, and AnimateDiff to pull the whole thing together.
For the motion reference, I choreographed a short dance sequence and recorded it on my phone. It is crucial to exaggerate the performance to capture the raw energy and dynamism of the motion. Translating real-world movement into animation can often result in flat, awkward visuals; this is known as the “rotoscope effect.” To avoid this pitfall and create compelling animations, we need to make sure our choreography matches that of a cartoon character! In traditional animation, movements are often amplified for dramatic effect, and characters can defy real-world physical limitations, adding flair and interest. Special techniques like “rubber hose” animation and strategic joint-breaking bring characters to life in ways live-action can’t match. These approaches help infuse animations with the energy and appeal that might be lost in a direct translation from a live performance. “The Animator’s Survival Kit” by Richard Williams is a great resource for those interested in diving deeper into animation principles and techniques.
LTDR, the recording will look strange and awkward on you, but on the cartoon character, it’ll look great! Trust the process.

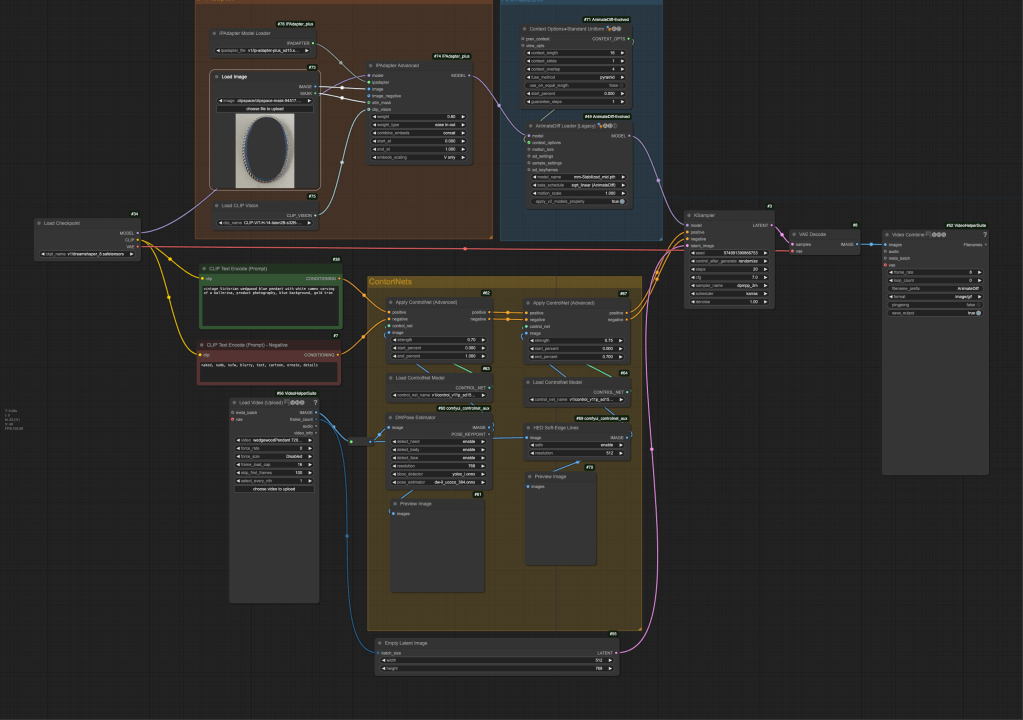
When using GenAI to translate the motion to our character, I needed to adapt a few pre-existing workflows. Since this character is a 2D drawing, many of the tools available for character animation will not work. Many out-of-the-box tools rely on face and pose detection, but with a 2D drawing, those features and details are lost and are only represented via abstract lines and shapes. The workflows I modified for 2D characters were a combination of LatentVision’s character stability video as well as Mickmumpitz’s style transfer video. The workflow functions by using IP adapters to reference the character’s style and structure in a T Pose image, another IP adapter to reference the original structure of the recording, and finally, a ControlNet to pull the poses from the reference video. Similar to motion capture, we can now pull our movements from our recording and swap in the character.

Above is a simplified diagram, and below is a full image of the workflow. Note that the ControlNet for line art has been bypassed; this ControlNet will only be useful if your original video matches the elements of your character. For example, if you cosplayed as your character, the line art ControlNet would be useful because it matches your lines with the character’s lines. In this case, however, it is useless and would make things too similar to the reference image rather than our target character.
You can also download the json file here (link)

3) Final Editing!
Of course, after all that work we still need to generate sound effects (ElevenLabs), music (SunoAI), and finally edit everything with some good fashion manual video editing!
Jump back to table of contents
Wedgwood Pendent Dancer
Created on April 2024
Tools Used: RunwayML and AnimateDiff

In this animation test, we have a semi-realistic porcelain dancer on a pendant. Inspired by James Gerde’s AI work, I wanted to see if I would achieve a similar output. Similar to the rotoscope pipeline in the previous project we’ll be using AnimateDiff and ControlNets to influence our output. However, unlike before, we are not green-screening our character for the final output. Instead, we want the entire composition to be outputted in ComfyUI. This means instead of compositing the footage after the AI render, we’ll need to do a rough composite of the footage beforehand.


For this test, I used an underwater dance video by the athlete Zoe Poulis. When we do the rough composition, it is important to pay attention to the lines and shapes rather than the color. When the composition is run through the ControlNets, color information is not passed through to the model; it is only information about the dancer’s pose and the overall lines of the image.
Using a simplified version of the character animation workflow we can see our four key components for influencing the model’s output.

- ControlNet DWPose – tracks poses
- ControlNet Soft Edge – dictates composition
- IP Adapter – style reference, for my workflow I used a mask to highlight only the blue pendant and not the background or silver trim. This can be seen in the full detailed workflow below not but the simplified workflow above.
- Prompts – overall
You can also download the json file here (link)
Jump back to table of contents
Favorite Tutorials and Creators
- Latent Vision: https://www.youtube.com/@latentvision
- Sabastian Kamph: https://www.youtube.com/@sebastiankamph
- MDMZ: https://www.youtube.com/@MDMZ
- Fantastic at breaking down workflows and going through them step-by-step. I usually get inspired by enigmaic_e, but go to MDMZ for more details.
- enigmatic_e: https://www.youtube.com/@enigmatic_e
- Amazing creator and always makes incredible work.
- Andrea Baioni: https://www.youtube.com/@risunobushi_ai
- Fantastic at product photography, Andrea is the person you should follow if you’re interested in realistic product/fashion photography.
- Corridor Digital: Check out their rock paper scissors series for some incredible AI animations https://www.youtube.com/watch?v=_9LX9HSQkWo
- To see a breakdown of their workflow, you’ll need to get a subscription to their website ($4) https://www.corridordigital.com/
- Paul Trillo: https://vimeo.com/paultrillo
- If you’re looking for inspiration Paul is a fantastic director that uses AI in his videos. He is incredibly thoughtful about the way he uses AI.
